| HOME |
| Introduction |
| The Layout Plan |
| Fictional history |
| Construction Projects |
| Stock |
| Contact Me |
Construction Projects
The Church
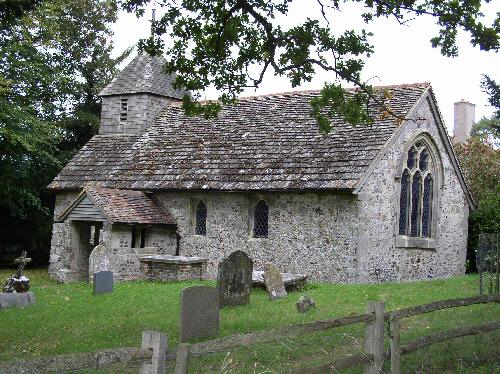
During the design stage I was very clear that I wanted a small church towards the back right hand corner. Equally, of course, it had to be a Sussex church - and a small one!
During my travels around Sussex I kept looking for one but none were quite what I wanted. Then, when my partner and I were having a stroll in the countryside close to Pulborough Brooks, we saw, crowning a small hill and peeking at us through the trees, a beautiful small old Sussex church which looked ideal. This was the parish church of Wiggonholt - an unlikely enough a name to justify being used on a fictional railway!
Looking at it I was confident that it would require little re-scaling to fit in the available space. On a return visit I measured it and was astonished to find that in the 1/4inch to the foot scale I had decided to use for background buildings it was, in fact, an exact fit in the available area. The construction was typically West Sussex, walls largely from a mixture of local stones (chalkstone, sandstone and flint all appeared to figure in it) with a classic and traditional Horsham slab roof. The entire church, by virtue of this construction, hundreds of years of patching and re-patching and and equally old layer of lichen growth had an amazing texture which I felt I had to try to capture.
Numerous photographs were taken, both internally and externally. Although I would not be able to produce an exact model it nevertheless provided a perfect prototype which would have the character I wanted.
The church as we first saw it:-
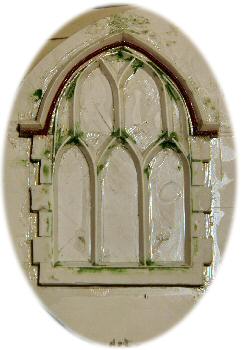
Looking at the church I actually felt very few compromises (largely due to my limited abilities!) would be needed. In fact, the main one was the window design. After considering various techniques, materials etc I decided that I would change these to a simple gothic arch which, while still tricky, would be much easier to model without, I felt, unduly changing the character.
A large number of drawings were prepared and consideration given to how best to proceed. In the end I decided that I would attempt to make the windows before anything else as these, I felt, would be the most challenging part.
The technique I finally used was to mark the design on a sheet of approx 1/2mm plasticard, and then, using this as guidance, build the initial stone "framing" using 3.2mm triangular Plastruct Finline plastic rodding.
The main window under construction can be seen below.
 |
One of the things that becomes apparent is that try as
I might, with my ageing eyes and clumsy fingers, I couldn't get the
curvature quite identical on all the sections. But, I did the best I
could and I am pleased with the final result. As a first stage, all of the triangular window "frames" including the outer surround were bent and glued in position with MEK. I then made up cill and surround blocks, themselves supported on more plasticard cut slightly smaller (for reasons I will come to later) to bring them up to the same height as the triangular sections. The top arch on the real thing protrudes significantly beyond the rest of the window line and has a main arch as shown with a small parallel moulding beneath it which was produced from plastic rodding. Unsurprisingly given my abilities (or lack of!) there were a number of untidy joints and small gaps which were filled with Squadron plastic filler. Finally, the windows were carefully cut out, the entire assembly cut way from the underlying plasticard and the filler gently sanded and filed. |
Once the church body (which I will come to
later) was ready for the windows to be fitted, the hole in its outer
cladding was cut fractionally undersize, while that in the main
structure was significantly oversize. The undersize hole meant that the
window frame could sit on the cladding which helped hold it in position. |
|
 |
I used Lazertrans inkjet waterslide decal paper to produce the stained
glass windows. These were actually photographs of the real ones from
inside the church, resized using Paint Shop Pro and then carefully cut
out and positioned on the glazing in the appropriate places. |
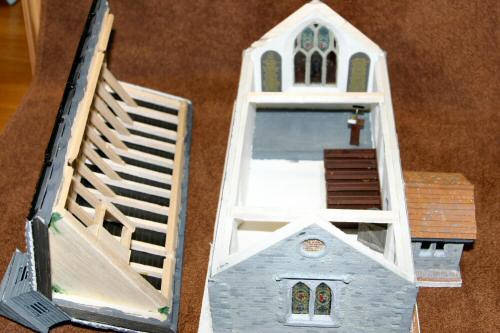
Constructing the roof
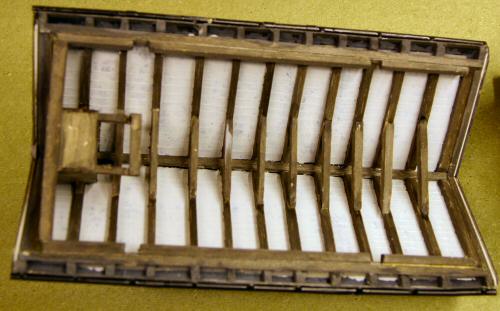
Once the walls were completed the roof structure commenced. Balsa wood was used
for the longitudinal timbers and the end rafters. These were formed over the
body shell to ensure the shape was accurate. The remaining rafters were cut to
shape and added, together with the reinforcing - and prototypical - struts. Each
was glued and pinned in place while the glue dried. You can also see the
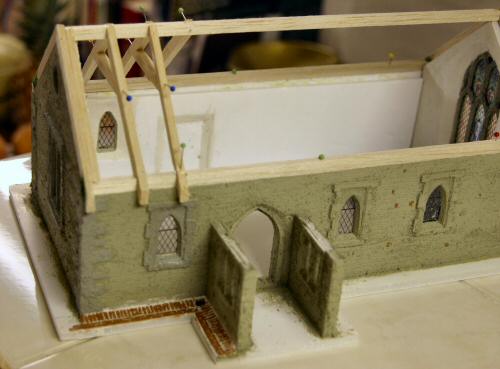
interior filling I referred to above has been done and the porch walls made up
and fitted. The entire structure has been clad in random stone and flint plastic
card and an initial coat of textured paint applied.
In the picture below, the roof structure has been completed. Once all the rafters, purlins etc were in place, and the lower part of the belfry formed the roof was first clad with two sheets of plastic card. Due to the method of construction this sat firmly on the rafters and was glued in place. It, in turn, was covered with successive strips of thick cardboard, their size reducing as the ridge was approached. These were in turn textured. The porch roof was built in the same way but OO scale slate plastic card was used to represent the small clay tiles used on the prototype. The roof timbers were stained with dilute "dirt" paint and the underside of the roof interior was painted off-white.
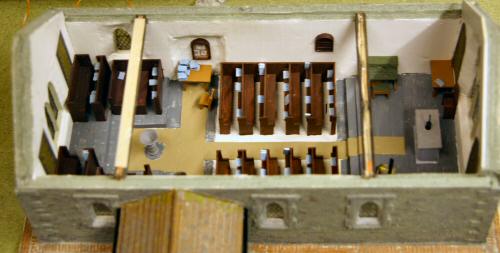
The picture below actually shows the roof before staining and painting the interior, but more importantly it shows the first steps towards detailing the interior. Also seen here is the belfry, with its louvres and the porch roof referred to above. The guttering is also a little more visible. This was made from offcuts of (real !) exterior cladding, the tongue of which produced a perfect scale "U" shaped channel. In this picture you can just make out the two heavy rafters which run from wall to wall and which server to brace both the walls and the roof in the real thing as well as supporting the main (and inadequate) lights.
You can just make out the church door which has been modelled partially open. The pews have been started, a simple exercise from plastic strip and plastic card. The lectern is also made from these materials. A small piece of brass wire and an offcut of triangular section plastic have been used to represent a light.
The items to each
side of the window appear, in the prototype, to be made of slate slabs with the
Lord's Prayer and the Apostle's Creed engraved on them and picked out in gilt.
These were reproduced with the aid of the computer - with strong enough a
magnifying glass they are even readable!
Below is the fully detailed interior (well, nearly - I forgot the cassocks!). As you can see all the furnishings have been reproduced largely with plastic card and strip. The carpet is actually fine grad glass paper painted buff. The hymn books are made from plastic strip with blue paper glued around them. Even the tables and individual chairs are produced from plastic card and strip.
The two roof trusses are very visible in this shot. Both have had LEDs fitted beneath them with the wires carried through grooves cut in the top of the beams. The one on the left has a cover fitted while the one on the right still awaits one. They will both be stained to match the rest of the beam.
While only a small amount of this detail will be visible in the completed model "in situ", I know it is there. The roof can always be lifted to look at it, and there is no need to worry about which bits will be visible from which angles.
Just visible is the brickwork walking/drainage area which goes all around the church, sloping slightly away from the wall initially for drainage and then levelling out. This was actually made with individual bricks cut from 7mm scale plastic card brickwork. They were initially dry brushed with brown paint, and then dampened DAS modelling clay rubbed over them. This was wiped off with a damp cloth, leaving it filling the gaps to represent cement. A further dry-brushing of a medium grey followed.
The picture below shows the completed exterior. The church is sitting in its final location but has yet to be inset into the "ground". It is raised about 2 inches above "ground level" which helps give it prominence at this end of the layout. Like the prototype, the roof and parts of the wall are heavily covered in lichen picked out in this case by dry brushing with a very yellowish green. The ridge tiles are plastic tube cut in half longitudinally and the flashing is simply paper which has been painted a pale grey.
The orangey wavy bit sticking out to the left is one of the wires for the
lighting. These actually emerge under the church and will, in due course, go to
a circuit board and thence to the power feed in the church "cellar" - i.e. a
hole cut in the expanded polystyrene which forms the basis for the scenery yet
to come!
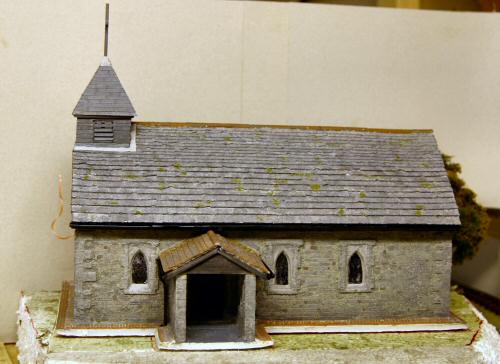
I will add a further picture once the church is properly installed and I will TRY to take one with its lights on.
Well, below, is the church in its final location. I have yet to finish the lighting installation and obviously the church graveyard needs some "fixtures and fittings"!
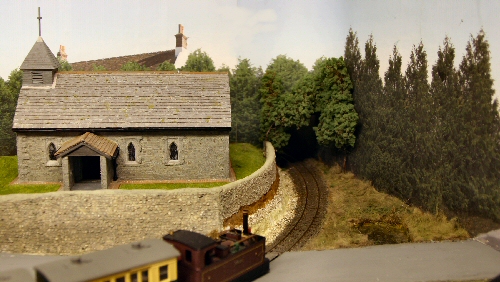
As you can see a fair amount of scenic work needed to be done in this corner. The church is 2" above the baseboard level and needed retaining walls. To the right this is quite shallow as it is deemed to have been built on a shallow chalk embankment. The brown represents the soil which will largely vanish beneath grass and weeds shortly. You can also just make out a band of flint beneath this with the exposed chalk below and small pieces of flint and chalk which have fallen into and largely filled the trackside cess. The wall to the front of the churchyard represents random knapped flint with a degree of coursing here and there (based on an example near Steyning). You may note that the wall starts to slope down to the left, as indeed, the road starts to slope up. The two are destined to meet off to the left where the entrance to the churchyard will be. Unseen in this shot, the path from the church door runs to the wall and then bends sharply to slope down just behind the wall.
The backscenes are digitally manipulated photographs printed on A3 paper and stuck on using Artists mounting spray. The trees in the corner are simply sea moss which had roughly the right shape to match the Leylandii behind the church and were covered with some Auhagen ground foam foliage of approximately the right shade.
The very rough grass to the right is made of
traditional carpet underlay and has yet to be trimmed.