| HOME |
| Introduction |
| The Layout Plan |
| Fictional history |
| Construction Projects |
| Stock |
| Contact Me |
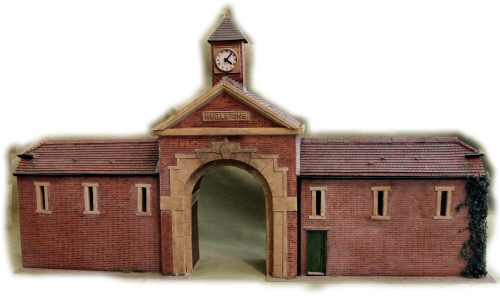
The Clock Tower
An exit from an estate railway
It has been sometime since I updated this website. The shops (see here) are still being worked on and deserve an update in their own right. But, for the last month, my spare modelling time has been taken up with this project.
By way of background, a fellow member of our local 7mmNGA group was creating a small 7mm (albeit standard gauge) layout representing a small part an estate railway. This was scheduled for showing at SWING on 25th April and it was going to be very difficult to get everything done in that time albeit with the assistance of other members of the group.
So, our exhibition manager had two ideas. The first was that the exit from the main board, rather than the usual tunnel/bridge could actually be through a substantial gatehouse/clocktower such as might be at the entrance to a large stable and carriage yard. His second idea was that I should build it .... hmmmmm.
So - that's what I have been doing. So here's picture of the nearly completed result of my labours!
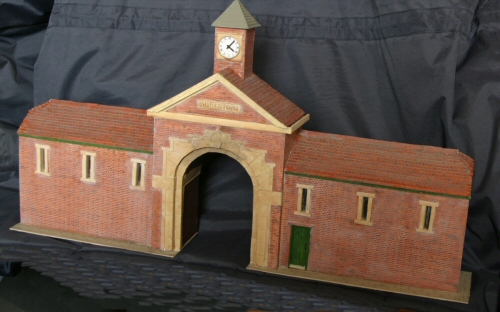
Construction uses a basic foamboard shell as I usually do. Brickwork is plasticard. Stonework, roofing shells, clocktower shell, slating and tiling are good old Kellogg's cornflake cardboard (the boxes, not the flakes!).
Painting is with Winsor & Newton Galleria acrylics with the whole thing softened and colours somewhat blended by a thin wash of matt grey acrylic. On the whole I am very pleased although it probably needs a number of decent close-up photos to do it justice. Bear in mind it is some 20 inches long
Amongst the features which are either not apparent or even not yet fitted are:-
-
Clocktower has a brass finial
-
The clock has individual hands which add to the depth of it
-
The door has woodgrain effect and features a stable type hasp and handle
-
Full flashing is being fitted
-
Victorian style ogee guttering has been made.
At this point to do includes finishing the flashing, fitting the gutters and downpipes, adding lichen and moss in appropriate places on the roof and "planting" a few weeds, grass etc around the base of the walls. I will TRY to remember to take more photos, including close-ups before I part with it!
Well, it's finished at last, and will be going to its new home within the next couple of days.
Photos below, showing:-
Full frontal
Three-quarter view
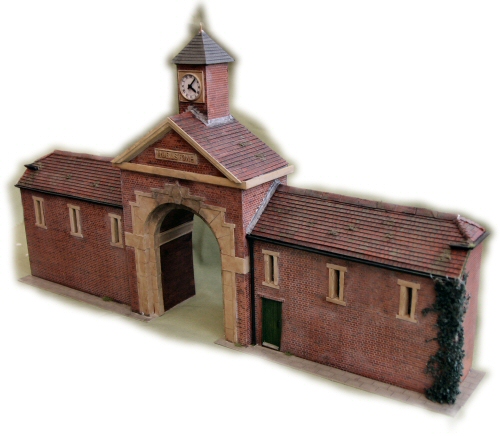
While it could undoubtedly be improved upon it's not bad by my pretty poor standards and I, in all honesty, am well pleased with it. NOW, hopefully, even though it is the time of year when modelling opportunities become limited, I shall be able to get on with some of my own!